Financial Plan for SaaS Companies
Introduction
Building a financial plan for SaaS companies on Pry is much easier than Excel.
In this tutorial, you'll learn how to build a financial plan on Pry for a SaaS company from scratch. The goal of this tutorial is to end up with a fully functional financial model that is comprehensive and easy to maintain.
We will cover how to build a hiring plan, create a driver-based revenue model, determine our monthly growth targets, and review our overall cash flow.
TipIf you are following along, this tutorial should take around 15 minutes to complete. After your financial plan is set up, you can start looking into scenario planning, forecasts vs actuals reviews, and creating a custom dashboard with SaaS Metrics or other KPIs.
Pre-Requisites
Connected Financial Accounts
To get started on your financial plan, you should first have your financial accounts connected to Pry. Connect to your financial accounts directly or via our Quickbooks Online or Xero integrations. Follow our setup guide to learn more about importing data to Pry.
Up-To-Date Books & Simple Forecasts
It is easier to build your financial plan if you have your bookkeeping up to date. When you have an outsourced bookkeeper, the information will be updated as they close your month end.
After your books are up to date, you will need to add your fixed expenses and recurring vendors' forecast on your financial report.
For this tutorial, we will start with our demo account of an early-stage SaaS startup that has books up to date.
1. Setup a Hiring Plan
Add Existing Employees
We are going to start by adding all of our existing employees to the hiring plan. We need to fill in the name, role, annual salary, and start date.
Let's start with the CEO. Click on the + icon followed by Add Hire. After that, fill in the Name as Richard. Type CEO and click on the New Role option in the dropdown menu or press "Enter" on your keyboard. For Annual Salary field, enter $100,000. The start date is May 2021 and we'll leave the end date blank.
Repeat the steps above with the remaining employees below:
- Gilfoyle, CTO, $100k, May 2021
- Dinesh, Software Engineer, $100k, May 2021
- Jian Yang, Marketing Specialist, $90k, May 2021
- Jared Dunn, Customer Support, $65k, May 2021
Planning for Future Hires
After we're done adding our existing employees, we can start planning for future hires. We want to quickly scale our product so let's plan for additional software engineers and some content marketing.
To plan for future hires, we follow the same steps as adding employees, but we leave the name empty or you can also leave it as Employee # (default).
Let's add the following roles to our plan with varying start dates.
- 4 Software Engineer, $100k each, Start Dates: July 2021, September 2021, November 2021, January 2022.
- 2 Content Marketing, $80k each, Start Dates: August 2021, November 2021.
TipEmployees connected via payroll integration and future hires have a different color highlight over them on the hiring plan.
Review Total Expenses
After adding both existing and future hires, let's review the overall monthly spending on payroll and make adjustments to our hiring plan. We already factor in payroll taxes on a separate line item on the financial report. You can adjust the payroll tax % through the Hiring Plan settings.
We can use the charts on the hiring plan to review the total headcount and costs or switch back to the Financials tab to see an overall picture.
From the financials report view, it seems like our runway is lower than what we want, so let's go back to the hiring plan and remove one software engineer and one content marketer from the hiring plan. It is good practice to review your cash flow each time after updating a variable on your business model.
You can do a lot more with our hiring plan feature like planning for salary raises, planning for multiple hires, tying future hires to a model, or adding sub-departments. Read more about our Hiring Plan feature here.
2. Plan for Headcount Costs
After we finish with our hiring plan, let's move onto variable expenses. These usually include employee benefits, equipment, or software expenses.
We are looking to forecast for Equipment(s) for new hires and Health insurance expenses for our employees.
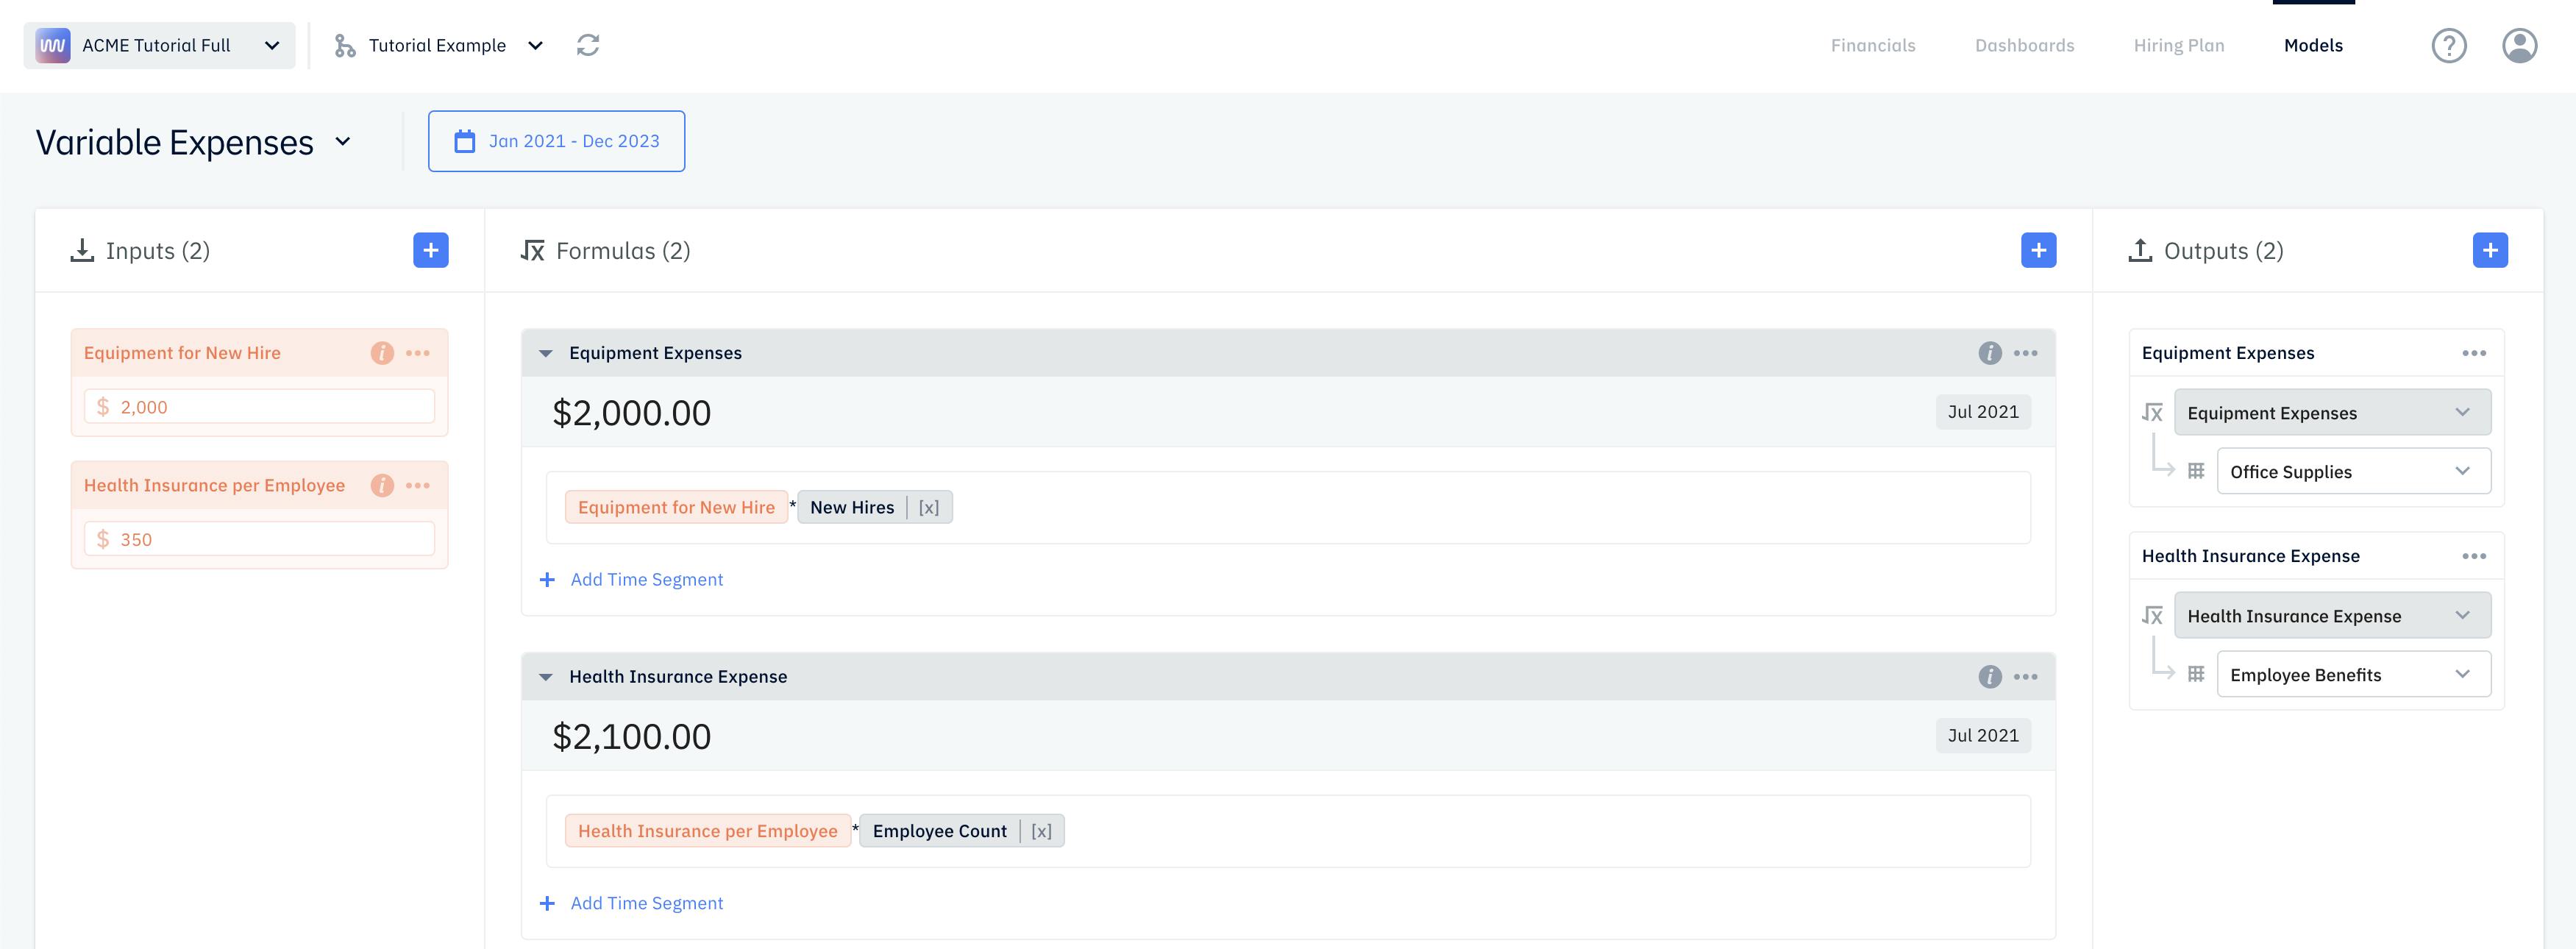
To start, let's head to our Models tab through the upper right corner. From there, let's create a new model called Variable Expenses by clicking on the dropdown arrow next to the current Models title followed by the + sign.
New Hire Equipment
Let's forecast a laptop and monitor for every new hire coming in. We start by creating a currency variable by clicking on the + next to input and selecting currency.
Name this variable Equipment for New Hire and set it to $2000.
Next, click on the + on the formula column to create a new formula. You can name this formula Equipment Expenses.
Click on the arrow to expand the formula dropdown and set the formula to Equipment for new Hire * New Hire variable. The New Hire variable is a built in variable from your hiring plan. For every New hire coming in, we will multiply it by the Equipment for New Hire variable we created previously.
After setting up the formula, click on the + on Output column and select Office Supplies. This will tie our Equipment Expenses formula to our Office Supplies Expense accounts.
Health Insurance
We want to also account for health insurance expenses for our employees. Let's create another currency variable by clicking on the + next to input and selecting currency.
This time we name it Health Insurance per Employee and set it to $350.
On the formula column, let's create a Health Insurance Expense formula. Expand it and type in Health Insurance per Employee multiplied by Employee Count. The Employee Count is also a built in variable from our hiring plan. We are multiplying the Health Insurance per Employee variable by our total employee count.
We will now create an output to map Health Insurance Expense formula to Employee Benefits to map our health insurance forecast to our financial report.
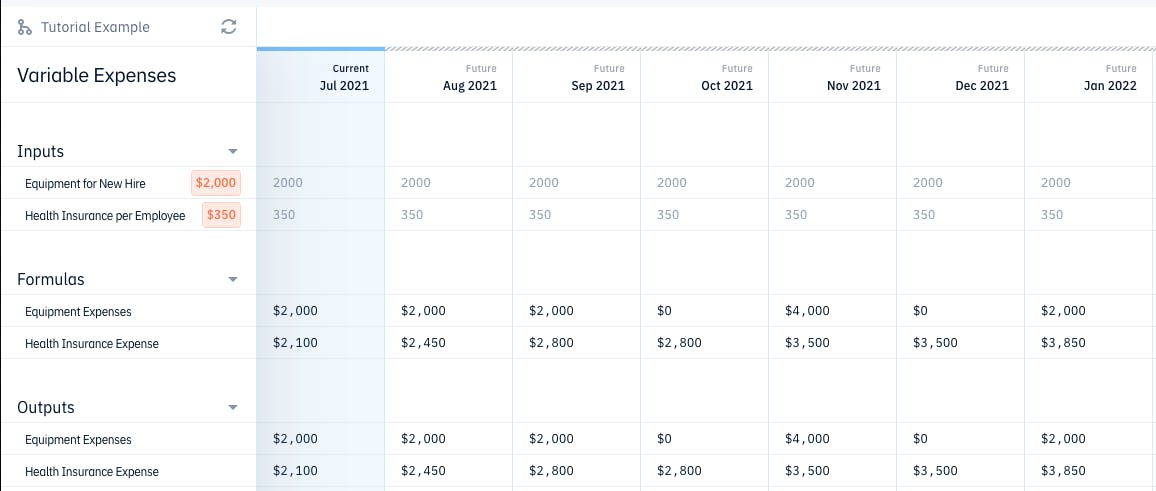
Let's scroll down to the table below to see if the costs are changing over time. We can see that the expenses are changing with more hires coming in. Let's also go to the Financials tab to review the overall Financial Report.
3. Creating a Revenue Model
The last piece on our financial plan is the revenue model. We will use a monthly fixed % growth model on customers.
Let's create another model called Revenue by clicking on the dropdown arrow next to the current Models title followed by the + sign.
Assumptions for Subscription Model
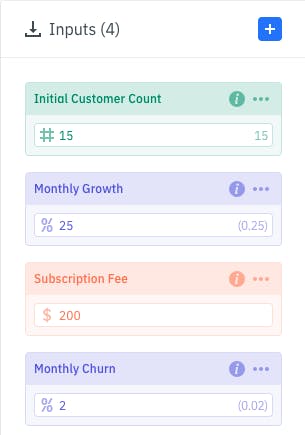
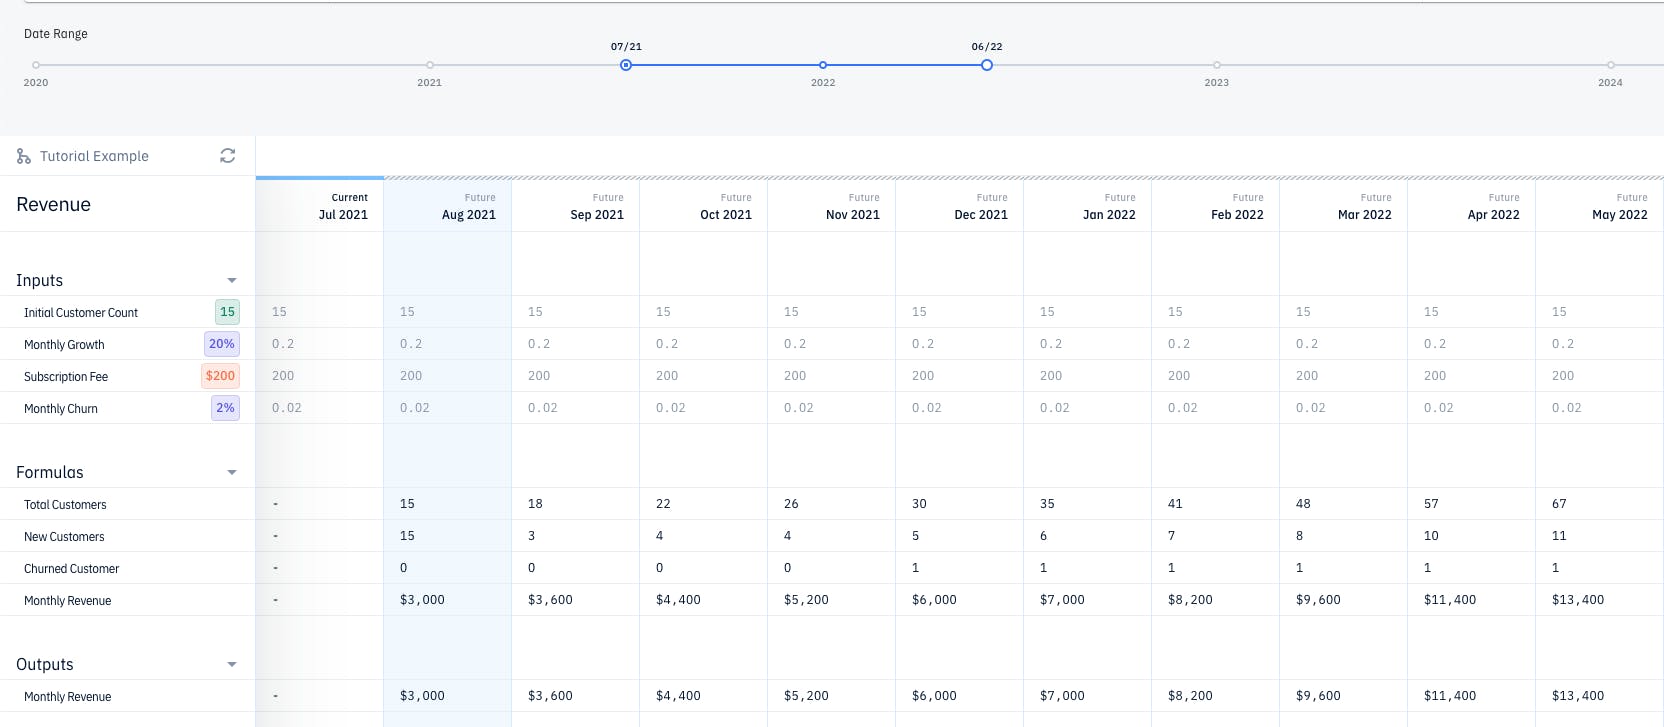
First, we need to list out all the assumptions needed for our revenue model. For an early stage SaaS business, this typically includes average revenue per customer (ARPU), Monthly Growth Rate, Monthly Churn Rate, and an existing customer count. We will use the following:
- Subscription Price: $200
- Monthly Growth Rate: 25%
- Initial Customer Count: 15
- Monthly Churn Rate: 2%
Next, let's start adding formulas. Click on the + Sign next to Formula four times to add four new formulas.
Rename the formulas to: Total Customers, New Customers, Churned Customers, Monthly Revenue as we are also forecasting our customer growth.
Now let's add the mathematical calculation for these formulas.
Total Customers: The formula is last month Total Customers + New Customers - Churned Customers. To show last month total customer, you can reference the formula itself and it will Display Total Customers [x-1]. The x-1 represent last month.
For New Customers: Use time segment feature to split the formula to 2 different computation.
For the first box, set the end date to May 2021 and inside the box add in the Initial Customer Count variable.
For the second box, use last month Total Customer multiplied by the Monthly Growth Rate. Let's also use our helper function ROUND() to get whole number of customers. The ending formula should be: ROUND(Total Customer [x-1] * Monthly Growth Rate).
For Churned Customers, the formula is last month Total Customer multiplied by the Monthly Churn Rate. Let's also use our helper function ROUND() to get whole number of customers. The ending formula should be: ROUND(Total Customer [x-1] * Monthly Churn Rate).
For the last formula, Monthly Revenue, the formula we will use is Total Customer * Subscription Price. You can scroll down to the table below to see the revenue growth.
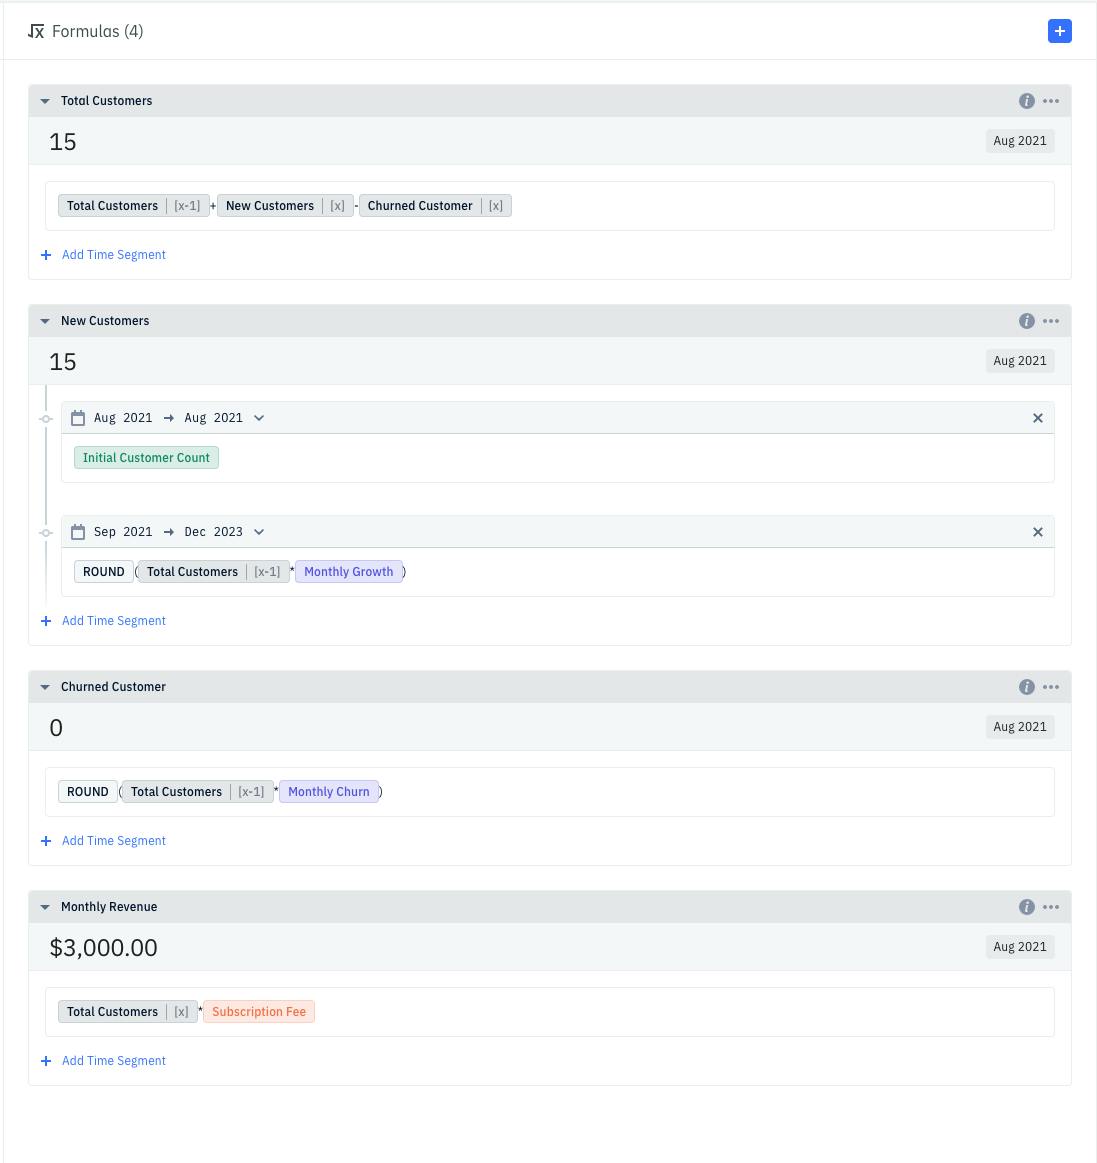
After setting the formulas, let's create an output and map our revenue to the financial report. In this case the only financial number is our Monthly Revenue formula, so we will only create one output that ties Monthly Revenue to an Income account.
Review Financial Projections
Table View
Once you are done setting up the formulas, you can scroll down on the Models page to see a table view of the formulas number and they are changing over time. You can use this table to review the revenue model and to double check your numbers are growing as expected.
Financial Report
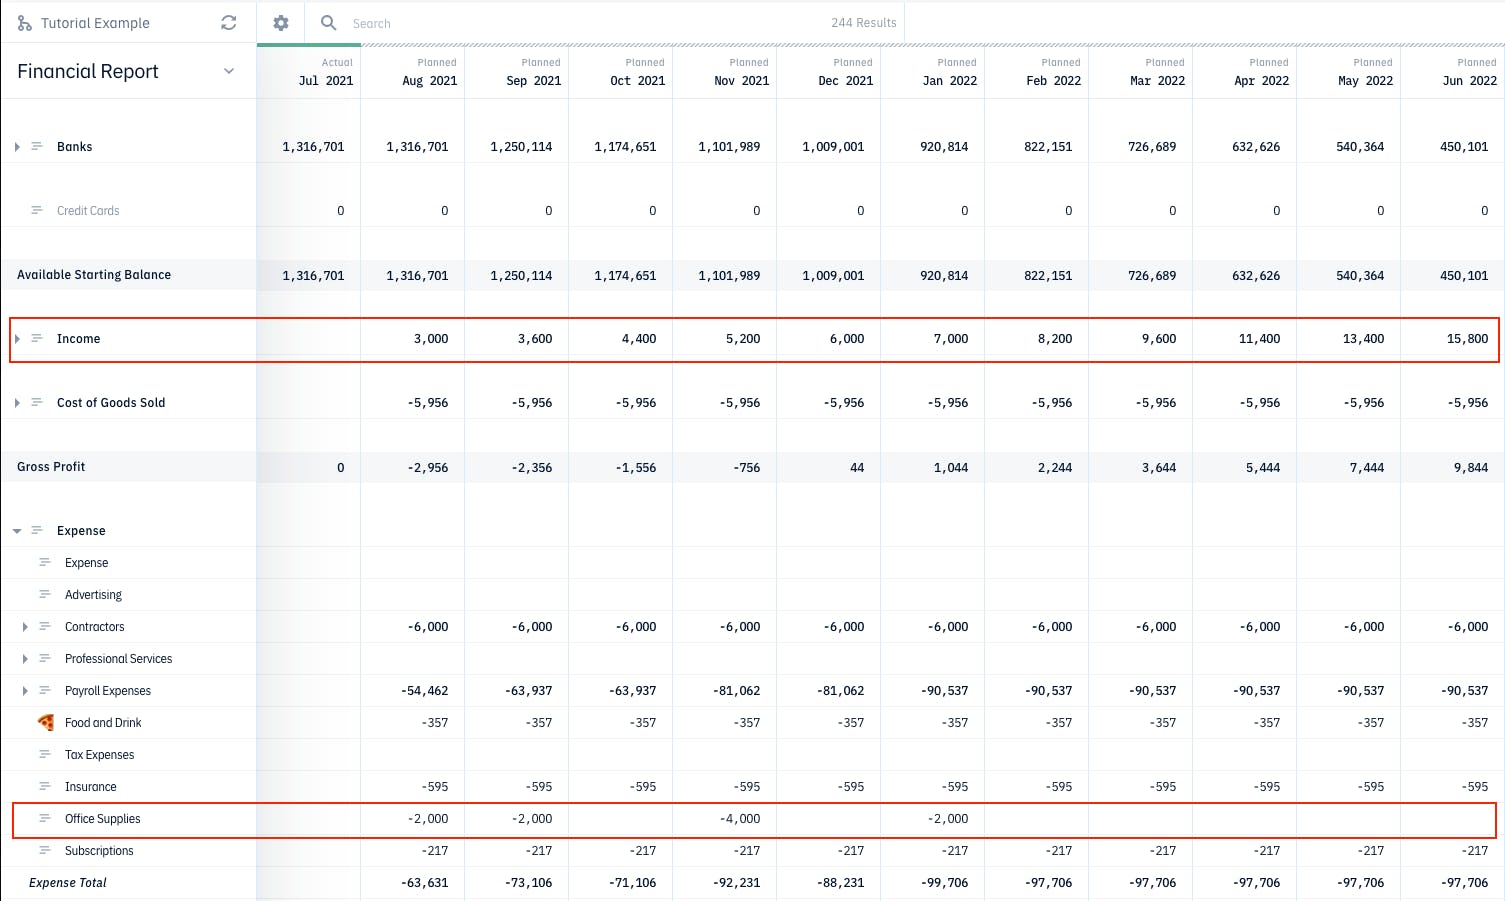
Head back to the Financials tab to review the outputs of your model. In this case we should have our monthly revenue forecasted out, hiring costs, as well as overhead expenses added in. You can review your future burn rate and see what areas of your Financial Report need adjustments.
4. Review Financial Plan
Let's start reviewing our financial statements after the initial setup. This typically includes your profit & loss, balance sheet, & cash flow forecast. To get started, click on the Financials tab to see a complete picture of our financial report.
Projected Income and Expenses
Scroll down on the Financial Report to see the forecasted financial statement. With our revenue added in, we can see that our runway is not as bad as it looked like earlier, so we can go back to the hiring plan and add back the software engineer and content marketing roles we wanted to hire for early 2022.
You can see the impact they have on our cash runway and future expenses as soon as they are added in.
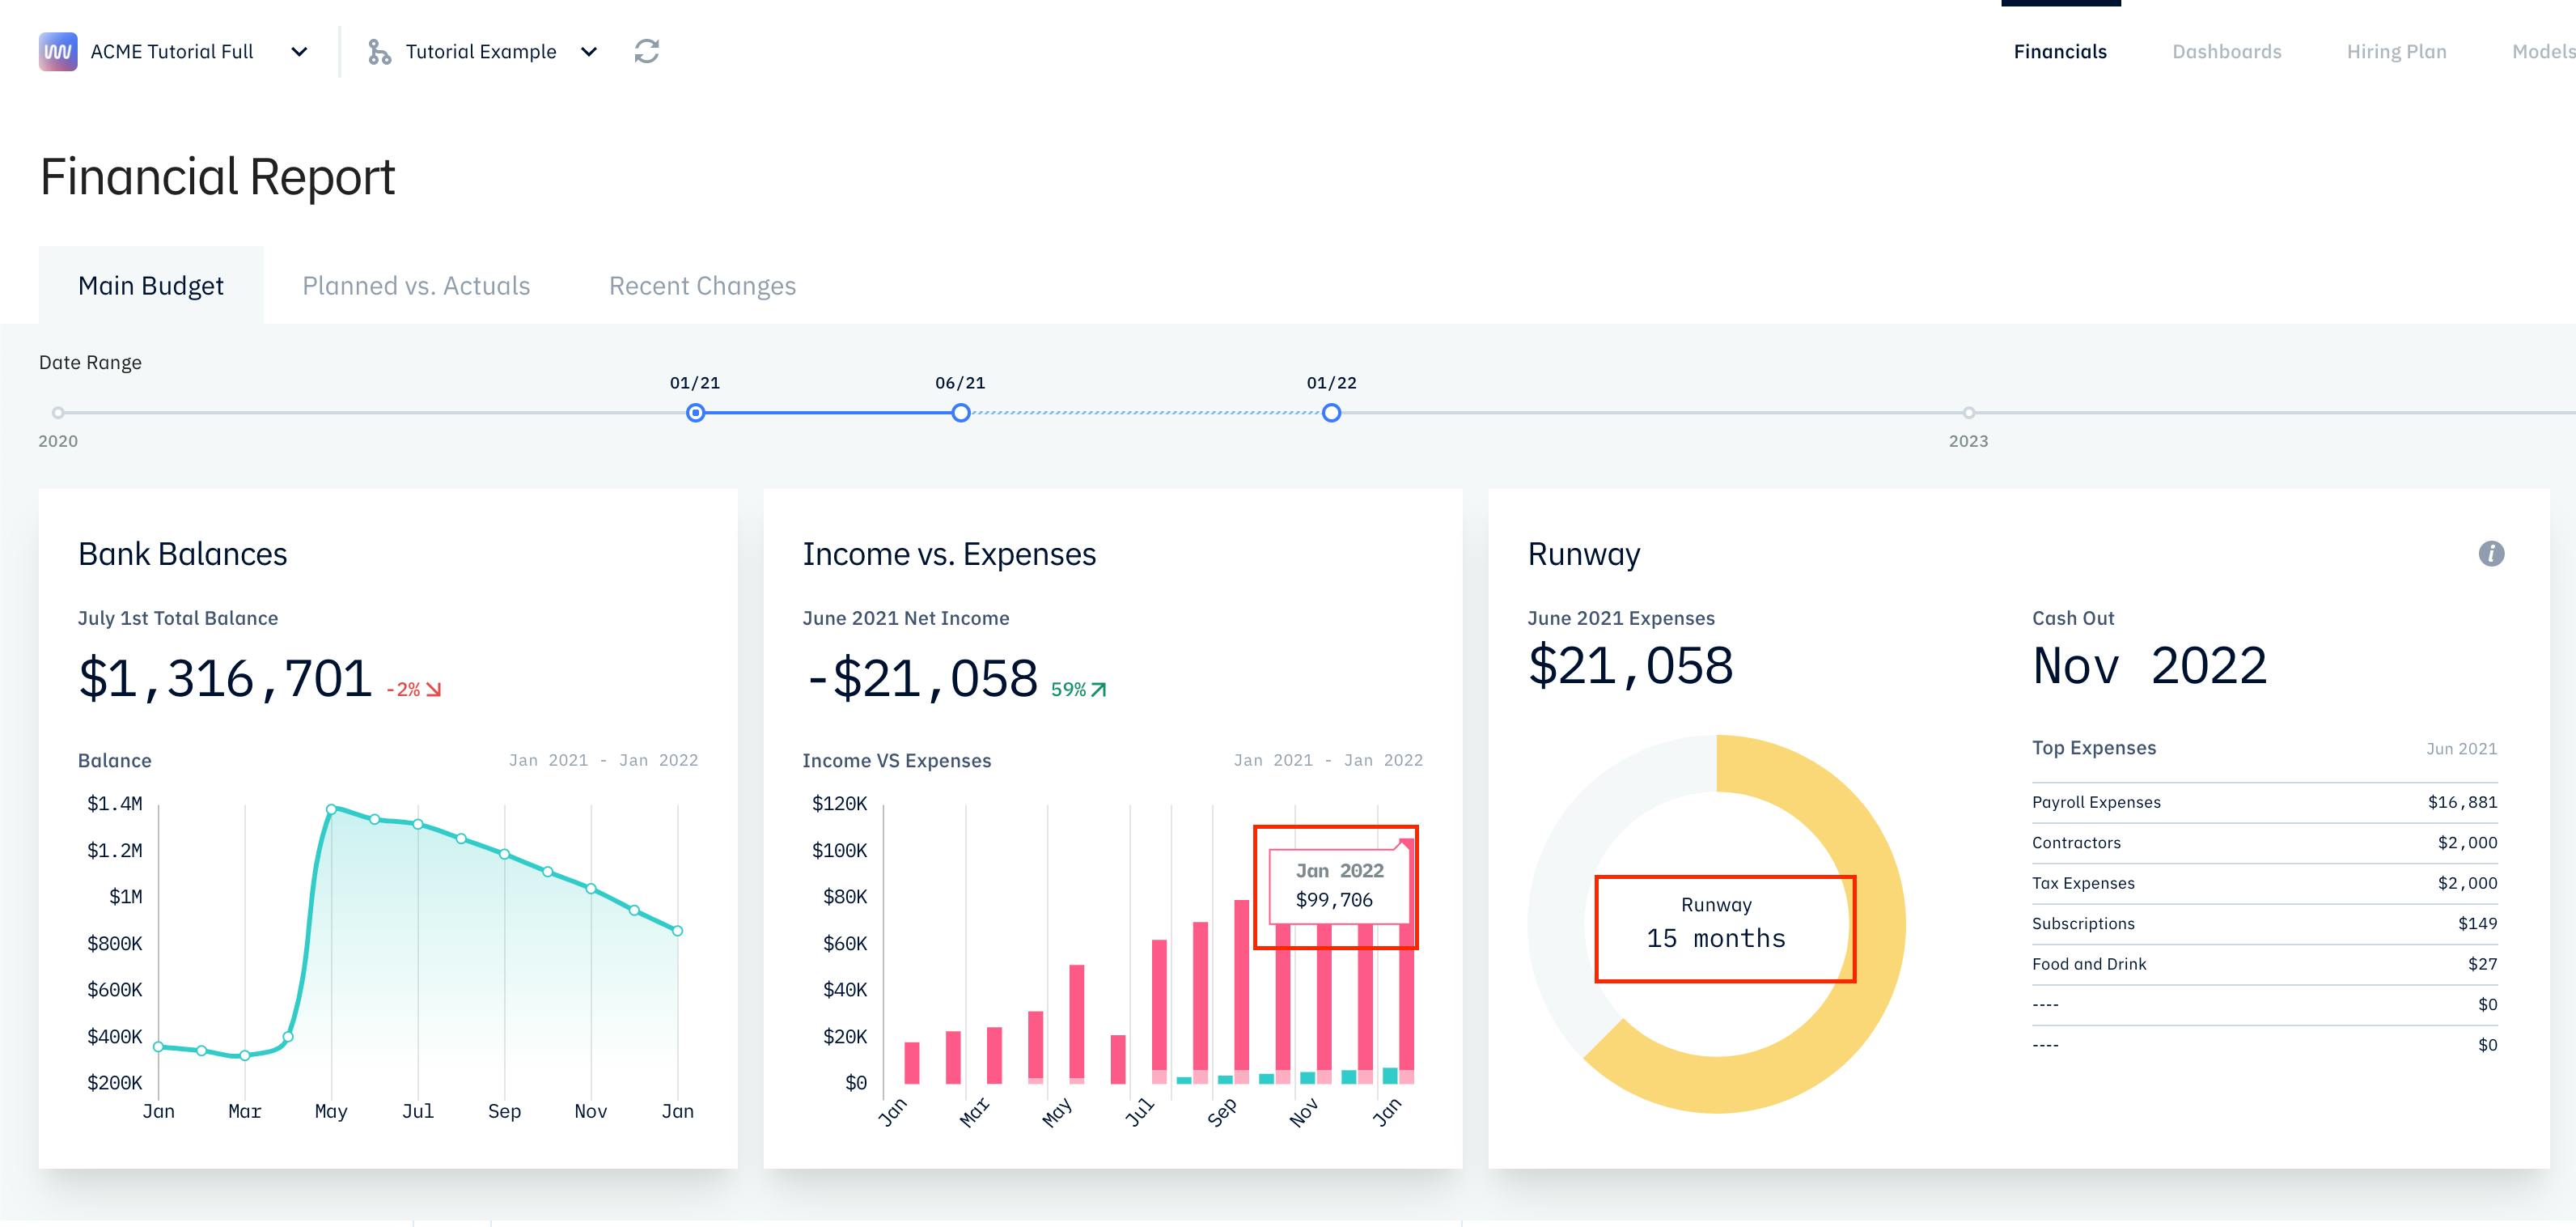
Cash Balance & Runway
On the Financial Report view, there are charts to help us visualize our financial plan. The most important questions I want answered from these charts are:
- Do I have enough money in reserve before my next fundraising round?
- If I do not plan to fundraise, am I going to be cash flow positive before our bank balance hits 0?
- How many months of runway do I have?
- How quickly are my expenses growing? How about my revenue growth?
- What's my current bank balance?
We want to be as conservative as possible when looking at our runway chart, so let's switch our runway calculation to Runway (No Growth) by clicking on the ℹ️ next to the runway charts. There are other runway calculations such as the Startup Runway, which is commonly used for new users.
You can read more about the different types of runway calculations here.
Review Dashboard (Optional)
This step of the tutorial is optional. We already have a fully built financial plan after reaching the last step of the tutorial.
Let's take a look at our dashboard as well to review our financial plan. We can access our Dashboards by clicking on the Dashboard tab on the menu in the upper right corner.
We can visualize our data in colorful graphs and share them with other people. It is easier to track KPIs and identify trends.
A template dashboard is provided, but you can customize it to display data that you care about.
Our custom dashboard allows you to keep track of important SaaS metrics such as customer acquisition cost (CAC), MRR, ARR, LTV, Retention, ARPU, New Customers, profitability levels, and create fundraising plans. You can also include financial metrics on the dashboard.
Learn more about creating a custom dashboard here.
Adjusting Variables on Dashboard
If you decided to create a custom dashboard, you can also add inputs to control variables such as growth rate or pricing levels without having to go to the Models page and see the impact they have on our financial plan.
For example, we can control our Monthly Growth Rate variable as well as Monthly Churn Rate and see the impact they have to our MRR/ARR numbers.
You can create different scenarios and set min and max variables for a sensitivity analysis. Click here to read about our scenario planning feature.

Align Goals
We now have a complete financial plan for a SaaS business with variables that are easily adjustable. Remember to set realistic targets and goals for your business model for your current company stage. Keep track of your metrics and execute each step along the way to achieve your desired outcome. This includes future headcount, sales goals, and forecasted expenses.
We can now prepare for our next fundraise or create a board deck for our next investor meeting. Remember that financial planning is an ongoing process that needs to be reviewed every month.